首页cms布局的样式修改代码,一篇实用的Seven主题修改教程。
- 原文来源:详情
效果:

下面进入正题部分,代码和修改位置。。
步骤:
/*buju */
@media (min-width: 992px) {
	.post-list.content-card .cart-list {
		-webkit-transition: all 0.3s ease;
		-moz-transition: all 0.3s ease;
		-o-transition: all 0.3s ease;
		transition: all 0.3s ease;
	}

	.post-list.content-card .cart-list:hover {
		transform: translateY(-6px);
		-webkit-transform: translateY(-6px);
		-moz-transform: translateY(-6px);
		box-shadow: 0 26px 40px -24px rgba(0, 36, 100, 0.3);
		-webkit-box-shadow: 0 26px 40px -24px rgba(0, 36, 100, 0.3);
		-moz-box-shadow: 0 26px 40px -24px rgba(0, 36, 100, 0.3);
		-webkit-transition: all 0.3s ease;
		-moz-transition: all 0.3s ease;
		-o-transition: all 0.3s ease;
		transition: all 0.3s ease;
	}
}
.content-card .post-info {
    margin-left: -2px;
}
.post-list.content-card .cart-list:hover{
  box-shadow: 0 0 15px #ddd;
  transform:translateY(-5px)
}
.home_title {
    display: -moz-flex;
    display: -ms-flex;
    display: -o-flex;
    display: -webkit-box;
    display: -ms-flexbox;
    display: flex;
    padding: 16px 20px;
    white-space: nowrap;
  border-bottom: 10px solid #e7e7e7;
   background: white;
}

.home_title>section {
    -webkit-box-align: center;
    -ms-flex-align: center;
    align-items: center
}

.home_title .title {
    display: -o-flex;
    display: -webkit-box;
    display: -ms-flexbox;
    display: flex;
    -webkit-box-flex: 1;
    -ms-flex-positive: 1;
    flex-grow: 1;
    padding-right: 20px;
    display: block;
    white-space: nowrap;
    text-overflow: ellipsis;
    overflow: hidden;
    width: 100%;
    width: calc(100% - 48px);
}
.home_title .title h3 {
    font-size: 18px;
    color: #333;
    margin-right: 8px;
    display: inline-block;
    vertical-align: bottom
}

.home_title .title span {
    font-size: 12px;
    color: #999;
    font-weight: 300
}

.home_title .title span b {
    color: #2C74E6;
    margin: 0 4px
}
.syfl .grid-bor{
      padding: 14px;
  		background: white;
}

.syfl .grid-bor .cart-list{
box-shadow: none;
}

@media screen and (max-width:873px){
  .home_title {
    border-bottom: 3px solid #e7e7e7;
  }
  .syfl{
        margin-top: 10px;
  }
  .content-card .post-info {
    margin-left: -6px;
}
}
/*模糊*/
.blur {
    position: relative;
    -webkit-filter: blur(2px);
    -moz-filter: blur(2px);
    -ms-filter: blur(2px);
    filter: blur(2px);
}
.blur:before {
    content: "";
    position: absolute;
    display: block;
    height: 100%;
    width: 100%;
    left: 0;
    right: 0;
    top: 0;
    bottom: 0;
    z-index: 1;
}
直接把css代码复制到子主题的style.css里面。
第二步:
改首页文件,划重点。。首页文件位置在seven主题目录下的index.php文件,然后打开之后找到<main>,然后把<main></main>之间的代码全部干掉!!!(避免翻车,先把你网站文件备份一次好吧,翻车别找我,我是个不负责任的男人)
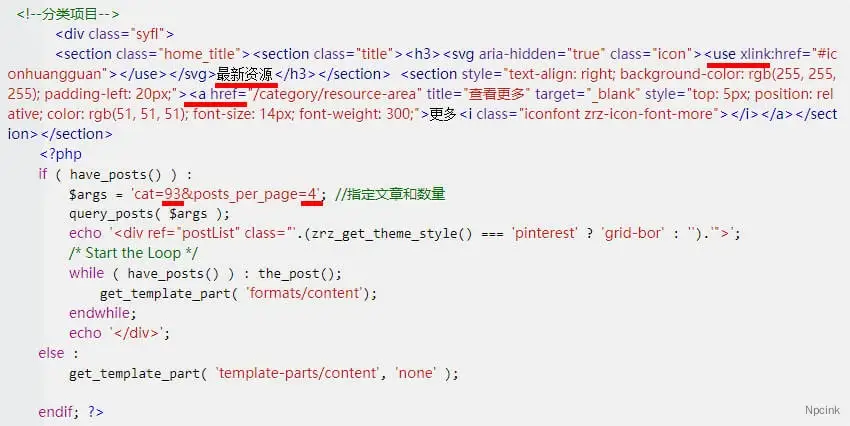
 <!--分类项目--><div class="syfl"><section class="home_title"><section class="title"><h3><svg aria-hidden="true" class="icon"><use xlink:href="#iconhuangguan"></use></svg>最新资源</h3></section> <section style="text-align: right; background-color: rgb(255, 255, 255); padding-left: 20px;"><a href="/category/resource-area" title="查看更多" target="_blank" style="top: 5px; position: relative; color: rgb(51, 51, 51); font-size: 14px; font-weight: 300;">更多<i class="iconfont zrz-icon-font-more"></i></a></section></section>
	<?php
	if ( have_posts() ) :
		$args = 'cat=93&posts_per_page=4'; //指定文章和数量
		query_posts( $args );
		echo '<div ref="postList" class="'.(zrz_get_theme_style() === 'pinterest' ? 'grid-bor' : '').'">';
		/* Start the Loop */
		while ( have_posts() ) : the_post();
			get_template_part( 'formats/content');
		endwhile;
		echo '</div>';
	else :
		get_template_part( 'template-parts/content', 'none' );

	endif; ?>
如上代码是一个分类的的代码,也就是你想弄几个分类,复制上面的代码几份就对了。接下来详细解释一下代码怎么改

总的五根红线,按顺序解释
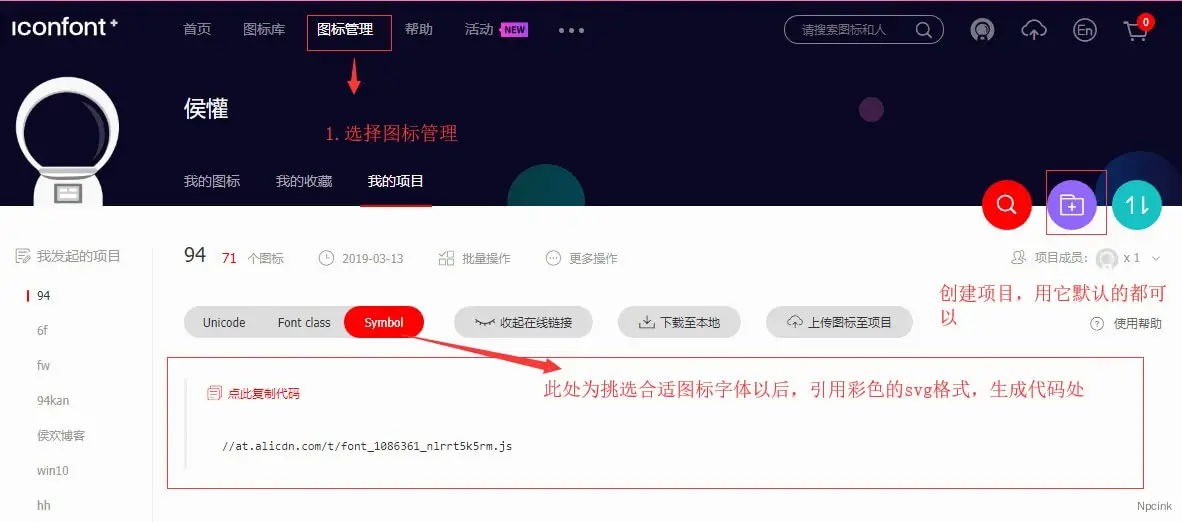
1.分类旁边的图标,参照
2.分类名称,没有自动获取,请自己手动修改
3.超链接,就是首页更多的超链接,自己更改当前目录的位置
4.93代表的是分列目录的ID,ID怎么查看?
进入后台,打开文章-分类目录-选择你要展示的文章的目录-点编辑-看地址栏有一个ID=数字,这个ID就是那个数字
5.4表示你当前想调用几篇文章,你想调用几篇就填几,这里说到一个细节,就是你的把柒比贰主题设置-基本设置-PC端默认文章展现形式改成【网格】,然后网格数目请填4比较适合
第三步
现在就差不多搞完了,但是你会发现为毛你的文章网格形式还有文章摘要,接下来讲讲怎么干掉摘要!
seven/formats/cotent/33行的代码,干掉!!!,教程完结

